Recent Posts

Showing posts with label basics for beginners. Show all posts
Showing posts with label basics for beginners. Show all posts
Sunday, September 30, 2012
Quick Tip: Finding Both Yarn Ends of Your Skein
Stitch and Unwind has pointed out a useful video and instructions on how to find the two yarn ends of your skein on allfreeknitting.com. Take a look. (Another great tip they mentioned in the video is to pull both ends of a clump of tangled yarn to unwind it)
Monday, August 27, 2012
Amigurumi Basics by a Beginner V:
5 More Basic Stitches & Techniques
Here're five more basic amigurumi techniques (click here for Part I):
7. Magic Circle or Ring
Now that you've mastered the single crochet, let's go back and learn the magic ring, the preferred way of starting an amigurumi round.
Also called: adjustable ring, magic loop
Good to know: You can substitute the initial "Ch 2. __ sc in 2nd chain from hook" instruction with the magic ring, doing the designated number of single crochets in the ring.
Tutorial: Check out my previous post.
8. Increase
Abbreviation: inc
How to: If you know how to do a single crochet, you know how to increase. Instead of working one single crochet into a stitch, you do more than one, which will increase the overall width (in rows) or circumference (in rounds).
Sometimes the pattern will just say "2 stitches in the next stitch", instead of "increase", and that's exactly what this is.
Purpose: Increasing (and decreasing) helps shape your amigurumi.
Good to know:
• Usually you will space out your increases evenly across the round. In patterns, for example, you'll see:
• Increases are easy to do, but keeping track of how many stitches you've done and when you need to increase can be tricky in the beginning. Try a stitch counter.
9. Right Side and Wrong Side
• The "right side" (abbreviation: RS) = the front of your piece
• The "wrong" side= the back.
How to tell: The stitches look different (check out the video below)
Another quick way to tell in amigurumi that is worked in rounds is that the side with the yarn tail from your magic circle sticking out is the "wrong" side.
Good to know: Whether you choose to show the right or the wrong side of your piece to the world is really up to you, and unlike the names, there really is no right or wrong. To ensure your amigurumi's surface looks uniform, you just have to make sure that all your pieces have the same side showing.
More information and comparison:
• All About Ami
• Video from Nerdigurumi comparing the differences. Interestingly, the sizes and shapes of the balls change depending on which side you've showing:
10. Front Loops and Back Loops
You will come across instructions that tell you to work in a specific part of a stitch, so what are they talking about exactly?
Let Stitch Diva Studio explain with a photo tutorial.
Good to know: Stitches that are worked in, for example, just the front loop, will look different from stitches that are worked in, say, the back loops. Crochet makes use of the different looks to add texture to your piece.
Take a look at this Crochet Spot's comparison.
11. Decrease
Abbreviation: dec, sc2tog (single crochet 2 together)
We saw how an increase makes the "circle" get bigger earlier. To make it go smaller, you'll need a decrease. Here, you're trying to join two stitches in the previous round together by making one stitch only.
How to:
1. Skip a stitch: generally not recommended because of the hole you'll leave in your piece.
2. Insert the hook into one stitch, yarn over, and draw up a loop. You don't complete that stitch, but insert the hook immediately into the next stitch, yarn over, and draw up another loop. Now you've three loops on your hook. You yarn over, and pull through all loops at once.
However...
I've never done anything but Planet June's invisible decrease to make sure the amigurumi looks as good as it can without too many bumps and holes caused by the decrease.
You can also check out All About Ami's photo tutorial on how to do an invisible decrease.
p.s. An invisible decrease requires you to work in the front loops, hence all that talk earlier about parts of a stitch.
Putting it all together: Let's crochet something already!
Now that you have all these stitches and techniques in your bag, let's try doing a common sphere shape, which will make use of the magic circle, single crochet, increase and decrease.
I find following videos and crocheting along is one of the best way to learn. Reading instructions can give you a headache sometimes, but if you've someone there to guide you through it's a lot less painful.
Here's one version of crocheting a ball. You'll find others on youtube.
7. Magic Circle or Ring
 |
| See my earlier post on how to do the magic ring |
Also called: adjustable ring, magic loop
Good to know: You can substitute the initial "Ch 2. __ sc in 2nd chain from hook" instruction with the magic ring, doing the designated number of single crochets in the ring.
Tutorial: Check out my previous post.
8. Increase
Abbreviation: inc
How to: If you know how to do a single crochet, you know how to increase. Instead of working one single crochet into a stitch, you do more than one, which will increase the overall width (in rows) or circumference (in rounds).
Sometimes the pattern will just say "2 stitches in the next stitch", instead of "increase", and that's exactly what this is.
Purpose: Increasing (and decreasing) helps shape your amigurumi.
Good to know:
• Usually you will space out your increases evenly across the round. In patterns, for example, you'll see:
*1 sc in the next 2 st, inc* repeat 2 times
We'll look at deciphering patterns later, but the above basically means:
Stitch 1: 1 single crochet
Stitch 2: 1 single crochet
Stitch 3: 2 single crochets in the same stitch (= increase)
Stitch 4: 1 single crochet
Stitch 5: 1 single crochet
Stitch 6: 2 single crochets in the same stitch (= increase)
In your previous round, you have 6 stitches, and in this round, you'll have 8 stitches because of the increase.
• It's important to keep your increases gradual and incremental. If you increase too drastically right away, you'll end up having a bunched up look.• Increases are easy to do, but keeping track of how many stitches you've done and when you need to increase can be tricky in the beginning. Try a stitch counter.
9. Right Side and Wrong Side
• The "right side" (abbreviation: RS) = the front of your piece
• The "wrong" side= the back.
How to tell: The stitches look different (check out the video below)
Another quick way to tell in amigurumi that is worked in rounds is that the side with the yarn tail from your magic circle sticking out is the "wrong" side.
Good to know: Whether you choose to show the right or the wrong side of your piece to the world is really up to you, and unlike the names, there really is no right or wrong. To ensure your amigurumi's surface looks uniform, you just have to make sure that all your pieces have the same side showing.
More information and comparison:
• All About Ami
• Video from Nerdigurumi comparing the differences. Interestingly, the sizes and shapes of the balls change depending on which side you've showing:
10. Front Loops and Back Loops
You will come across instructions that tell you to work in a specific part of a stitch, so what are they talking about exactly?
Let Stitch Diva Studio explain with a photo tutorial.
 |
| Source: Stitch Diva Studio |
Take a look at this Crochet Spot's comparison.
11. Decrease
Abbreviation: dec, sc2tog (single crochet 2 together)
We saw how an increase makes the "circle" get bigger earlier. To make it go smaller, you'll need a decrease. Here, you're trying to join two stitches in the previous round together by making one stitch only.
How to:
1. Skip a stitch: generally not recommended because of the hole you'll leave in your piece.
2. Insert the hook into one stitch, yarn over, and draw up a loop. You don't complete that stitch, but insert the hook immediately into the next stitch, yarn over, and draw up another loop. Now you've three loops on your hook. You yarn over, and pull through all loops at once.
However...
I've never done anything but Planet June's invisible decrease to make sure the amigurumi looks as good as it can without too many bumps and holes caused by the decrease.
Source: Planet June. Click here for the left-handed version
You can also check out All About Ami's photo tutorial on how to do an invisible decrease.
p.s. An invisible decrease requires you to work in the front loops, hence all that talk earlier about parts of a stitch.
Putting it all together: Let's crochet something already!
Now that you have all these stitches and techniques in your bag, let's try doing a common sphere shape, which will make use of the magic circle, single crochet, increase and decrease.
I find following videos and crocheting along is one of the best way to learn. Reading instructions can give you a headache sometimes, but if you've someone there to guide you through it's a lot less painful.
Here's one version of crocheting a ball. You'll find others on youtube.
Video from unwindpatterns
Note: The crocheter in the video uses two different decreases techniques. You can see how your piece will look, and you can also substitute one row with the invisible decrease and see which method you like better.
Wednesday, August 22, 2012
Amigurumi Basics by a Beginner IV:
6 Basic Stitches & Techniques
Alright, you've got your hook and you've got your yarn. Now we're ready to make something.
To create amigurumi, there are not too, too many basic stitches you'll need to know. Since there are many video tutorials online, I'm going to jot down quirks I've learned along the way, and list good links to check out instead of reinventing the wheel.
Note: UK and Am patterns use different terminology, so be sure to check which version of terms the pattern is using.
Here are the basic stitches / techniques. Feel free to jump to the video tutorials if you just want to get right to it.
As you may have read from this post, many amigurumi pieces begin with a magic ring. However, to make a magic ring, you need to know how to do single crochet. So, to practise this common stitch, I'd recommend learning to do a chain first.
Making chains is useful to know anyway when you need to crochet something flat, like an applique for your amigurumi.
1. Slip Knot: Getting the Yarn on the Hook Before You Start
 There are many different ways to tie this knot onto your hook.
Here are a couple: Crochet Spot • Stitch Diva Studios
Good to know: Slip knot doesn't count as a chain / a stitch.
2. Holding Your Yarn Just Right
With one hand holding your hook, the next thing is to figure out how to hold what is called the working yarn in the other hand.
There are again many different ways to do this. The important thing here is to keep the tension on the yarn at a comfortable level as you crochet. Most people on crochet videos I've watched have the yarn wrapped around their pinky finger, and they bring the yarn up and over the pointer finger, using those two fingers to adjust the amount of yarn you're "feeding" to your work.
Example: Crochet Spot
3. Yarn Over Hook (Often seen in patterns as YO)
 Another fundamental in crochet. After you insert your hook, you will wrap the yarn around your hook before you draw your hook back out. In some stitches, you'll also wrap the yarn before you insert the hook. As the name implies, make sure the yarn is "on top" of the hook and not under.
4. Making a Chain
Next we'll make a chain (also called foundation chain). It looks very similar to the paper chains you may have made when you're small.
Abbreviation: ch
Chart symbol: circle / oval
Good to know:
• The slip knot doesn't count as a chain (even though sometimes it suspiciously looks like one)
• The loop on your hook also doesn't count.
• You want your chains to be uniform in size. Using your thumb and middle finger to hold onto the previous chain as you make the next chain will help.
5. Crocheting into the Chain
I didn't realize there are different ways to crochet into the chain until way later, and I was doing it not necessarily the wrong way but just not the most desirable in my opinion.
All three ways are "right" so to speak, and it's really a matter of personal preference. Detailed explanation can be found at Crochet Cabana. If you like your stitches nice and snug you may want to avoid the first method.
6. Single crochet: Basic of Basics
Finally! Now you're ready to build on that chain you made.
Abbreviation: sc
Chart symbol: X or + sign
UK equivalent: double crochet
Use: The bulk of what you'll do in amigurumi is single crochet, and that's why most people will tell you that amigurumi is not too, too hard to learn, because you don't have to know a lot of the fancy crochet stitches.
Tutorial: Crochet Spot, or check out the following video.
And putting it all together...
Watching someone else is my preferred way of learning, so here're some links and great videos that can show you all the things we've talked about so far. Keep an eye on how these crocheters hold the yarn and do yarn over and all that.
• Hooks and Needles: this is the series of videos I watched a few months ago to learn to crochet. These were the only tutorials that made sense to me at that time.
• How to Start Crochet with Mikey: The first 6 minutes of so of this video covers all the above techniques, then it moves to doing double crochet. You can't get clearer instructions than Mikey's in my humble opinion.
Phew. That was a long post, and we've only just got to the fun part. More basic stitches and techniques to come...
To create amigurumi, there are not too, too many basic stitches you'll need to know. Since there are many video tutorials online, I'm going to jot down quirks I've learned along the way, and list good links to check out instead of reinventing the wheel.
Note: UK and Am patterns use different terminology, so be sure to check which version of terms the pattern is using.
Here are the basic stitches / techniques. Feel free to jump to the video tutorials if you just want to get right to it.
As you may have read from this post, many amigurumi pieces begin with a magic ring. However, to make a magic ring, you need to know how to do single crochet. So, to practise this common stitch, I'd recommend learning to do a chain first.
Making chains is useful to know anyway when you need to crochet something flat, like an applique for your amigurumi.

Here are a couple: Crochet Spot • Stitch Diva Studios
Good to know: Slip knot doesn't count as a chain / a stitch.
2. Holding Your Yarn Just Right
With one hand holding your hook, the next thing is to figure out how to hold what is called the working yarn in the other hand.
There are again many different ways to do this. The important thing here is to keep the tension on the yarn at a comfortable level as you crochet. Most people on crochet videos I've watched have the yarn wrapped around their pinky finger, and they bring the yarn up and over the pointer finger, using those two fingers to adjust the amount of yarn you're "feeding" to your work.
Example: Crochet Spot
3. Yarn Over Hook (Often seen in patterns as YO)

4. Making a Chain
 |
| Pop quiz: how many chains have been made so far? |
Abbreviation: ch
Good to know:
• The slip knot doesn't count as a chain (even though sometimes it suspiciously looks like one)
• The loop on your hook also doesn't count.
• You want your chains to be uniform in size. Using your thumb and middle finger to hold onto the previous chain as you make the next chain will help.
Chain Stitch Tutorial: Moogly
5. Crocheting into the Chain
 |
| The middle strand is basically the bottom strand of the next chain |
 |
| Insert your hook under the top strand of the chain |
 |
| Or insert your hook under the top and middle, right above the bottom strand |
 |
| Or turn your chain over and insert it into the "hump" on the back of the chain |
6. Single crochet: Basic of Basics
Finally! Now you're ready to build on that chain you made.
Abbreviation: sc
Chart symbol: X or + sign
UK equivalent: double crochet
Use: The bulk of what you'll do in amigurumi is single crochet, and that's why most people will tell you that amigurumi is not too, too hard to learn, because you don't have to know a lot of the fancy crochet stitches.
Tutorial: Crochet Spot, or check out the following video.
Video and Illustrated Tutorial: Lion Brand
And putting it all together...
Watching someone else is my preferred way of learning, so here're some links and great videos that can show you all the things we've talked about so far. Keep an eye on how these crocheters hold the yarn and do yarn over and all that.
• Hooks and Needles: this is the series of videos I watched a few months ago to learn to crochet. These were the only tutorials that made sense to me at that time.
• How to Start Crochet with Mikey: The first 6 minutes of so of this video covers all the above techniques, then it moves to doing double crochet. You can't get clearer instructions than Mikey's in my humble opinion.
Video tutorial from Mikey
• SassySophelia: First 6 minutes or so shows how to do a slip knot, a chain and single crochet.Phew. That was a long post, and we've only just got to the fun part. More basic stitches and techniques to come...
Saturday, August 18, 2012
Amigurumi Basics by a Beginner III:
Yarn

What yarn to choose? Here are some other expert opinions:
• The Silver Hook: advantages of acrylic yarn
• Freshstitches: review of wool, animal yarns, cottom, soy and bamboo
• Nerdigurumi: a case for cotton yarn
(I got a small skein of cotton / acrylic blend the other day and I love it. The stitches are so crisp. That particular Bernat yarn is discontinued though, and others I've seen are on the expensive side though, so I'm going to treasure my little skein)
• Craft Passion: how to substitute yarn
Learn how to read the stuff on a yarn label
• Craft Yarn Council
• Lion Brand Blog
What else & my two cents:
• Start with a lighter colour: The first ball of yarn I got was black, since it's my favourite colour, and I figure black will come in handy, but what I learned afterwards is that darker yarn makes it harder to see the stitches. No wonder I was having a hard time figuring out where I was supposed to insert the hook and where one stitch ends and the next stitch begins.
(Oh, and did you know that there are actually crochet hooks that will light up so you can see the stitches more clearly? Weird stuff.)
• Start with a cheaper and thicker yarn: Yarn is relatively cheap anyway when you consider how you can usually make a few amigurumi projects out of one skein. The various ones I've bought range from $3.99 Cdn to $6.99. While I sometimes find the cheaper ones (like the super saver kinds) are actually easier to crochet with, I do prefer the feel of the ones that are softer (like the Red Heart Soft Touch or the Bernat Satin). The problem with those is that in the beginning, when I wasn't used to the motions of crocheting, not to mention I was probably poking in all the wrong places and had to redo stitches frequently, I found the yarn split easily and that got me even more confused. I would suggest trying a cheap and thicker yarn as a starter to minimize the frustration.
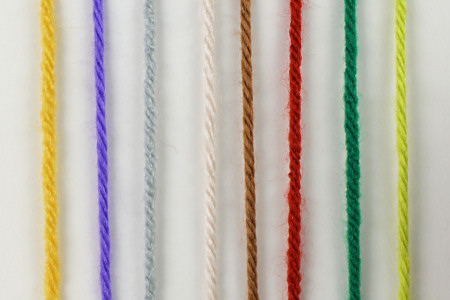 |
| Be sure to check out Planet June's experiment with different yarn (pic source: Planet June) |
Having said that, sometimes it's unavoidable when only a certain brand has that perfect colour you need. You may have to do an increase / decrease to adjust as you're crocheting along.
• Shine or no shine? Some yarn also has a shine to it (like Bernat Satin), and you may or may not like that effect, so watch for that.
• Giving your amigurumi to babies and kids? You may want to look for yarn that is washable.
Here're the websites of some common yarn brands. The sites are also good for free patterns.
• Red Heart
• Bernat
• Lion Brand
• Patons
• Caron
• Lily Sugar'n Creme
• Michael's Loops & Threads
Friday, August 17, 2012
Amigurumi Basics by a Beginner II:
Crochet Hooks
 |
| My Go-To Clover E 3.5mm Soft Touch Crochet Hook |
Here are two articles about crochet hooks:
• Nerdigurumi: An overview of the different parts of a hook, and a comparison of various brands.
• The Itsy Bitsy Spider: Another overview, a size chart (US and metric size), plus a look at crochet hooks made from different materials and how they affect your crocheting.
Learn how to hold a crochet hook:
• Crochet Spot: Photos on two most common methods: the pencil and the knife holds.
What else and my two cents:
• Each yarn label will tell you the recommended size of hook to use. For amigurumi projects, you usually use a hook one or two sizes smaller than the suggested size because you need to crochet tightly so no stuffing shows through.
• If you are having trouble inserting your hook in the stitches, that means you're crocheting too tightly and you can try a bigger hook. If your work ends up having more holes and the stuffing is showing, you should go one size down.
• A related concept is gauge, and that's another nice thing about amigurumi: you don't have to worry about gauge. Your creation usually doesn't have to "fit" someone, unlike crocheted clothing for example.
• What's your favourite crochet hook? The hook I used the most is the Size E Clover Soft Touch. I first started crocheting with another brand without the thumb rest, but after using the Clover kind, I'm never going back. (Make it more comfy to hold your hooks with pencil grips. Check out the tutorial on Instructables.)
• Be prepared for some aches and pain in your hands, especially in the beginning. Here's a good reminder video to keep your hand relaxed while crocheting.
Source: howcast & Lion Brand studio
Next up: Yarn
Thursday, August 16, 2012
Amigurumi Basics by a Beginner I:
General Introduction
If you've been in awe of amazing amigurumi creations... (here are some of my favourites)
...and are wondering whether you should learn how to make amigurumi (and the answer is yes!), start with these general introductions so you can get an idea of what you're up against.
• All About Ami: An excellent starting point if you want to learn more about amigurumi (materials and basic stitches)
• Freshstitches: Download the free eBook, including a penguin pattern.
• Craft Passion: Another quick guide to amigurumi.
• If books are more your kind of thing, you should definitely check out The Complete Idiot's Guide to Amigurumi by June Gilbank from your local library. It's got everything in it, seriously!
Next up: Crochet Hooks and Yarn and Other Materials
 |
| By Flickr user voxmortuum |
 |
| By Croshame |
 |
| By Crafty Is Cool |
• All About Ami: An excellent starting point if you want to learn more about amigurumi (materials and basic stitches)
• Freshstitches: Download the free eBook, including a penguin pattern.
• Craft Passion: Another quick guide to amigurumi.
• If books are more your kind of thing, you should definitely check out The Complete Idiot's Guide to Amigurumi by June Gilbank from your local library. It's got everything in it, seriously!
Upcoming Posts: Amigurumi Basics by A Beginner
 |
| One day, I'll make you, Doraemon, I promise! |
Three months ago, I dug up the amigurumi kit I've hidden in my closet for eight years, pulled out the hook and yarn, and watched my first video on how to crochet. With all the wonderful tutorials, tips and patterns others have shared online, I've discovered a wonderful and relaxing (mostly) hobby that I think will stick with me for a long time.
I thought while I still have a newbie mind and still remember all the things I struggle through, I'm going to write down all the things I've gathered online so far in my upcoming posts. I for one was, and still am, constantly stumped by instructions in patterns, which often include terms that may be second nature to seasoned crocheters but are totally baffling to beginners. (I still remember the first time I saw "FO". What is FO and how to do it?) I've had my share of digging up explanations online, so hopefully all this stuff I've gathered will save you some time.
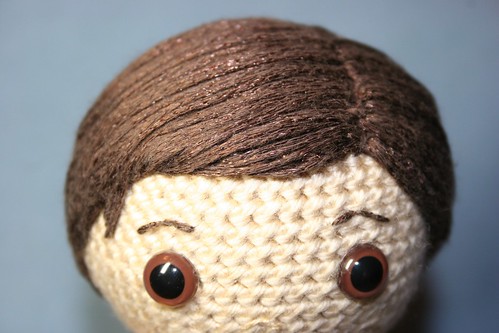
Learn: Adding Hair to Amigurumi
I'm working on a gift for a coworker, who is sadly moving back to the States, and I am going to have to figure out how to add hair to my amigurumi. (Um...I don't think the three strands on Wimpy Kid's Greg Heffley count).
Thought I'd share the following posts and tutorials to showcase the different ways of attaching hair:
1. Owlishly

Method: Create a wig cap (which is basically crocheting half of the head in the hair colour), then embroider hair on top of it strand by strand to style the look.
This is by far the most intense method, but just look at the results! So natural and so beautiful. It's worth all the extra work I think. Just check out some of her work if you are still unsure of the time required.
Unfortunately the yarn she used (Bernat Cool Crochet in Chocolate) is discontinued :(
2. EssHaych
.JPG)
Method: Latch hook style, adding hair one strand at a time directly onto head.
It looks pretty time consuming too, but perhaps a good one if you want a fuzzier look. Another look at this method can be found on Ana Paula's Amigurumi Patterns & Random Cuteness.
3. NeedleNoodles

Method: Making a fringe and then sewing that to the head.
As the author suggested, it's easier and faster than doing it strand by strand. I've tried it by winding the hair around a cardboard and it seems to work just as well, if you don't have the fancy tool.
Updated Sep 28: another tutorial on Woolly Toons
4. K and J Dolls Blog

Method: A blend of #2 and #3. Using the cardboard method to create equal length hair strands, then grabbing multiple strands together and sewing the bunch directly onto the head.
Other tips I've found:
-K and J Dolls Blog: you can do the top half of the head in the hair colour if you don't want to create a wig.
-MyGurumi: use fuzzy / eyelash yarn to create hair quickly, or try doing bobbles.
-By Hook, By Hand: A Flickr step by step photo tutorial on how to create wigs
-Xanadoodle: Here's a fun explanation on how to create different hairstyles using Star Trek characters as examples.
-Regardless of the method you use, you almost always start with determining your amigurumi's hairline.
-Get some thinner yarn to make a more natural look.
-Thick curly hair can be done by making a chain, then adding a longer stitch (hdc instead of sc for example) at regular intervals, or by crocheting increases all the way through. The yarn will naturally curl. For thinner curly hair, you may try unwinding your yarn into its individual strands.
Looking forward to trying some of these hair styles.
Thought I'd share the following posts and tutorials to showcase the different ways of attaching hair:
1. Owlishly
Method: Create a wig cap (which is basically crocheting half of the head in the hair colour), then embroider hair on top of it strand by strand to style the look.
This is by far the most intense method, but just look at the results! So natural and so beautiful. It's worth all the extra work I think. Just check out some of her work if you are still unsure of the time required.
Unfortunately the yarn she used (Bernat Cool Crochet in Chocolate) is discontinued :(
2. EssHaych
Method: Latch hook style, adding hair one strand at a time directly onto head.
It looks pretty time consuming too, but perhaps a good one if you want a fuzzier look. Another look at this method can be found on Ana Paula's Amigurumi Patterns & Random Cuteness.
3. NeedleNoodles

Method: Making a fringe and then sewing that to the head.
As the author suggested, it's easier and faster than doing it strand by strand. I've tried it by winding the hair around a cardboard and it seems to work just as well, if you don't have the fancy tool.
Updated Sep 28: another tutorial on Woolly Toons
4. K and J Dolls Blog

Method: A blend of #2 and #3. Using the cardboard method to create equal length hair strands, then grabbing multiple strands together and sewing the bunch directly onto the head.
Other tips I've found:
-K and J Dolls Blog: you can do the top half of the head in the hair colour if you don't want to create a wig.
-MyGurumi: use fuzzy / eyelash yarn to create hair quickly, or try doing bobbles.
-By Hook, By Hand: A Flickr step by step photo tutorial on how to create wigs
-Xanadoodle: Here's a fun explanation on how to create different hairstyles using Star Trek characters as examples.
-Regardless of the method you use, you almost always start with determining your amigurumi's hairline.
-Get some thinner yarn to make a more natural look.
-Thick curly hair can be done by making a chain, then adding a longer stitch (hdc instead of sc for example) at regular intervals, or by crocheting increases all the way through. The yarn will naturally curl. For thinner curly hair, you may try unwinding your yarn into its individual strands.
Looking forward to trying some of these hair styles.
Thursday, August 9, 2012
Quick Tip: Make Your Own Stitch Marker
There are many different ways to mark your stitch:
 |
| Makeshift stitch markers |
-Safety pins
-Paper clips
-Short piece of strap yarn, preferably of a different colour so it's easier to see
See an explanation of how to place your yarn as a stitch marker (which in this case, doubles up as a row marker too!)
 |
| Source: Clover USA |
-Plastic stitch markers: make sure you buy the ones that can open or split, or else your marker will be crocheted in.
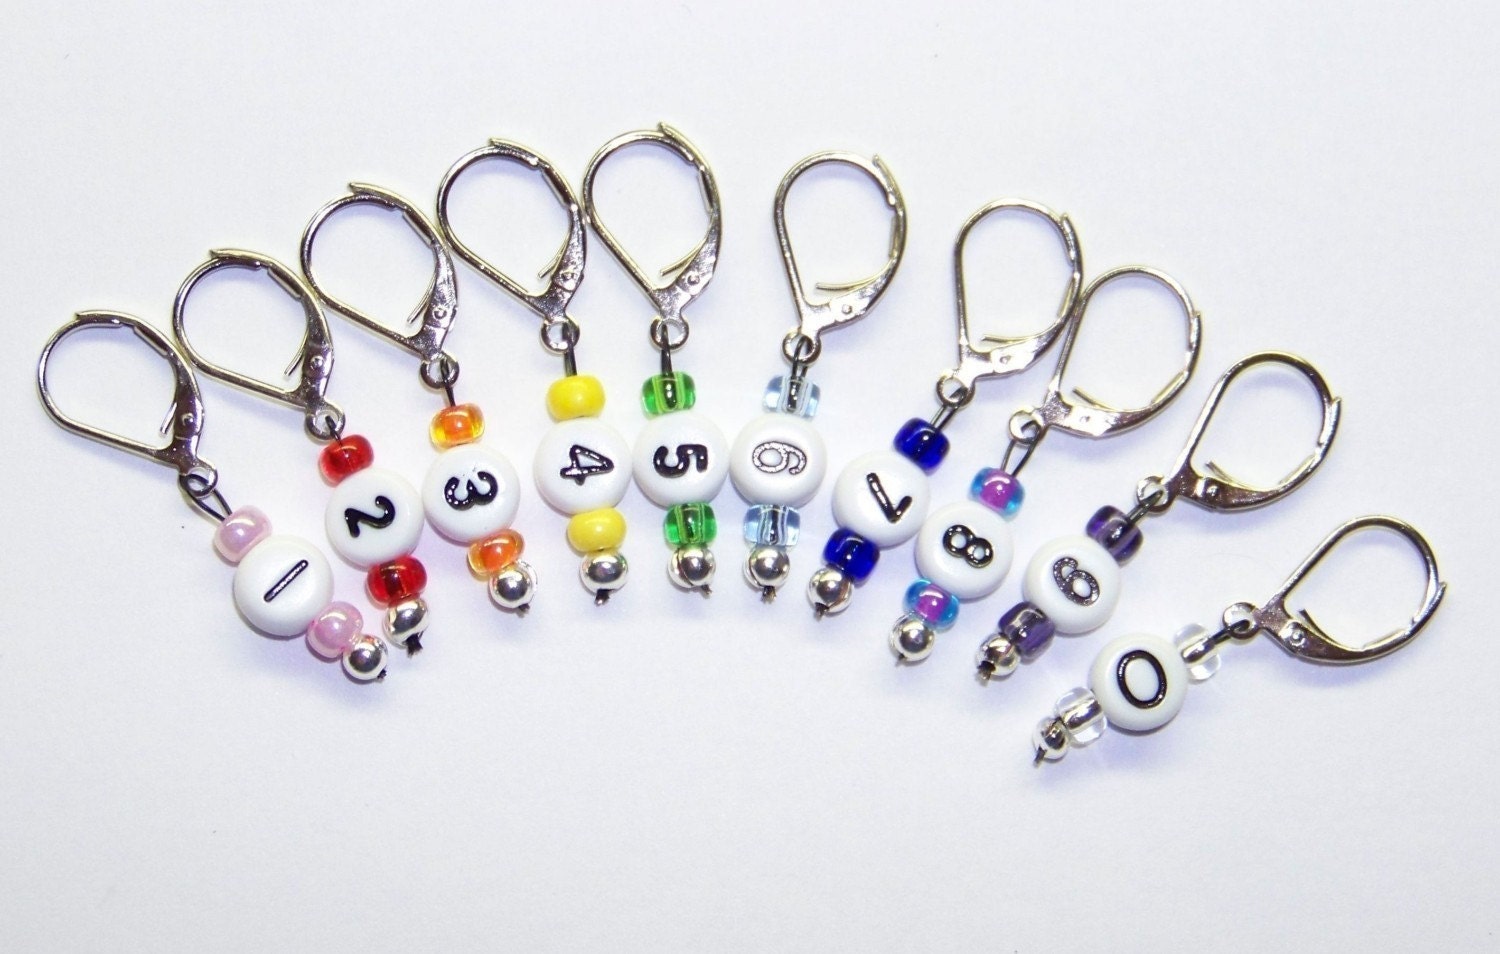 |
| Source: jeanettejed on Etsy |
With just a few bits like beads and wire, or recycled lobster claw clasp from old bracelets you don't wear anymore, you can create your own stitch marker. Here are different websites with instructions:
-CrochetMe Blog
-C.W.Frosting handmade stitch marker tutorial (also includes instructions on how to make beads from a torn magazine page. Nice!)
-Dollar store crafts (make sure you follow the crochet marker instructions, not the ones for knitting)
I just use yarn, 'cause it's light and not in the way, but it's fun to make your own stuff sometimes.
Thursday, August 2, 2012
Double Crochet Pattern:
Christmas and Stormtrooper Bell

How to do a double crochet: video • photo tutorial
If you're looking for a simple pattern to practise your double crochet, take a look at this simple five-minute Christmas Bell pattern by Handcrafted. Simple to make (they're not kidding about the five-minute part), you can use these bells for Christmas decorations, or a homemade wedding card.
On the website, you'll also find an angel bell, a variation of this pattern. Inspired by that, here's my Stormtrooper Bell.

What else has a bell shape?
Sunday, July 29, 2012
Learn: Magic Circle or Magic Ring
|
In first round of a pattern, when you see
Ch 2, 6 sc in second ch from hook
Just substitute it with a magic ring that has, in this case, 6 sc in it.

Prefer to watch someone demo it? You'll find lots of magic ring videos online. Here are two different ways to do it:
Source: PlanetJune
Source: apinchofhope
Have fun with your amigurumi!
Friday, July 20, 2012
Quick Tip: Stitch/Row Counter on Your Computer or Phone Part I

Useful? It has definitely been my saving grace when I first started. Since I was concentrating on doing the stitch right, or keeping track of where to increase / decrease, I lost count frequently. Not to mention your mind kinda wanders as you crochet... The only annoying thing with such counter is that you have to put down your work to fiddle with the counter constantly.
If you don't feel like spending money, or if you're looking for a less intrusive way to count your stitches, there are many free alternatives, right on your computer.
Free Stitch Counter Apps on Your Computer:
Because these online counters require just a hit of a key, you don't have to put down your work. I find it much more natural.

Chrome Browser (both of these can be added to your browser via the extension store):
Counter: A simple app you can add to your Chrome. Press the up (or spacebar) / down arrow to count up and down, and F5 to refresh the counter.
Simple Counter: Pretty much the same idea.
There are also some great apps out there for your iPhone and Android smartphones. We'll take a look at those in Part II.
Do you crochet in front of your computer?
Sunday, July 15, 2012
Quick Tip: Video Tutorials for Amigurumi Beginners
Without all the online videos, I don't think I'll ever learn how to make amigurumi. Once you've got the basics down, amigurumi is indeed not hard to pick up as many claim, but when I first started, I could not for the life of me decipher those diagrams that are supposed to show you how each stitch is formed. Luckily, many great crocheters out there have taken the time to create instructional videos. Thank you!
For me, what got me started on my amigurumi journey is Hook and Needles tutorials. You'll learn how to do single crochet, magic circle, increases and decreases. There is also a tutorial on how to read patterns.
Watching videos is a great way to learn amigurumi. The beauty is, if one video doesn't help, try a different one and you'll be sure to find one that makes sense to you. Try it out if you're starting off.
Tuesday, May 29, 2012
Learn: Making Different Amigurumi Shapes

This online sampler of the book will give you info on how to create triangles, cones, ovals, cylinders, circles, spheres, tubes and flat oval. Go to link

